Friday, October 18, 2013

“Spice-Roasted Butternut Squash With Red Onions”--A Witches Garden--"Double, Double, Toil, And Trouble"

A dark Cave. In the middle, a Caldron boiling. Thunder! Enter Witches. 


Three witches speak: --------'tis time! 'tis time! Round about the caldron go; “Double, double toil and trouble; Fire burn, and caldron bubble.” 

If that sounds familiar to all of my readers, it’s because it is a sentence from “Macbeth” by William Shakespeare. As Halloween is right around the corner, I thought it would be fun to talk about what is called a “Witches Garden”. Right now you must be thinking that I am a little “witchy”, but everyone has used the items that are grown in a “Witches Garden” at one time or another. 

A Witches Garden is a herb garden specifically designed and used for the cultivation of medicinal herbs and herbs used in everyday cooking. For centuries the “Wise Women” and healers understood the “magic” that herbs did for healing. During the medieval period monks, and nuns acquired this medical knowledge, and grew the necessary herbs to heal people. In fear of losing their power the nobility called the Wise Women and healers, “Witches”. They were said to be evil for using these practices to help heal the common people. They were eventually burned.

In today’s world, a “Witches Garden” is the center of her creations. The medicinal qualities from many plants and flowers growing within her scared space are simple in design. They contain a wealth of magical materials that can be used for healing. They were essences, lotions, cures, and some were ground up or dried. Some typical plants and herbs that are found in a Witches Garden are Rosemary, Sage, Parsley, Mint, Catnip, Marjoram, Chives, Thyme, Angelica root. They also had Bay leaves, Oregano, Dill, Basil, Mugwort, and wildflowers of all sorts.

Then there is the “Kitchen Witch.” Her garden is also her home as well as her kitchen. She works with the cycles of the seasons and the moon as she nurtures her garden sanctuary and growing sacred trees, wildflowers, plus harvesting culinary organic fruits and vegetables. The Kitchen Witch will spend time in her garden connecting with Mother Earth, and enjoying nature’s beauty. She meditates in a quiet spot perhaps on a calming chamomile lawn or under a shady tree. The Kitchen Witch shares her harvest with birds and wildlife. She recycles, composts, and tends to her plants with tender loving care. The Kitchen Witch recognizes that food is sacred, life-giving, and is part of the balance of nature. She uses the freshest ingredients with intent and purpose. She adds a little “magic” as she puts together a nourishing healthy meal using her herbs with her expert cookery skills. Her kitchen usually contains a comfy chair, she has utensils that are blessed and carved with scared symbols or sprinkled with a little “magic oil”. Don’t forget to look in your kitchen, you may see a special witch’s apron hanging on a hook, if you look hard enough!   

Herbs are an important addition in Italian cooking and can be grown easily in pots or in the garden. They should be stored in the freezer or hung up to dry in a cool place away from the heat. Once dry, they should be placed in air tight containers. The list of spices and herbs that Italian’s mostly use with their recipes are too many to mention, so I am going to give you a few of the important ones that my family uses. Basil, Garlic, Oregano, Bay Leaves, Mint, Flat Leaf Parsley, Black Pepper, Red Pepper Flakes, and Fennel. 

My recipe this week is a delicious way to use your herbs and spices. This easy, savory, sweet, and scrumptious side dish is full of flavor. A perfect recipe for this time of year called “Spice-Roasted Butternut Squash With Red Onions.” Enjoy and remember if you pass a herb garden, know that a “Witch” is not far away…...
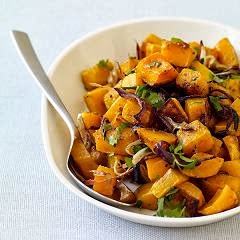
Spice-Roasted Butternut Squash With Red Onions.” 

Ingredients:
1 Tbsp light brown sugar
1 Tbsp ground cumin
1/2 tsp ground coriander
1/4 tsp freshly grated or ground nutmeg
1/8 tsp cayenne pepper
Salt to taste
2 small butternut squash (about 2 lbs each)
Peeled, seeded, and cut into 1/2 inch chunks
2 small red onions cut into 1/2 inch thick wedges
10 sprigs fresh thyme
4 Tbsp Olive Oil

Directions:
Heat oven to 425° F. In a small bowl, combine the sugar, cumin, coriander, nutmeg, cayenne, and 1/2 teaspoon of salt. Divide the squash, onion, and thyme between 2 large rimmed baking sheets. Toss the vegetables on each sheet with 2 Tbsp Olive Oil, then half of the spice mixture. Arrange in a single layer and roast, turning once, until golden brown and tender, 25 to 30 minutes. Serves: 4    

Till Next Time………………

Copyright © 2013 “Family Plus Food Equals Love” All Rights Reserved

Friday, October 11, 2013

“Stuffed Artichokes” For “Columbus Day” & “Italian-American Heritage Month”

Every year the United States President signs an executive order declaring October as “Italian-American Heritage Month.” This is a perfect time to enjoy the festivities surrounding "Columbus Day", and to recognize the many achievements, contributions, culture, history, and food, of the Americans with Italian descent. There were over 5.4 million Italians that immigrated to the United States between 1820 and 1992. Today there are over 26 million Italian Americans living in the United States. This makes them the fifth largest ethnic group. The New World was named “America” for Amerigo Vespucci (1451-1512), the Florentine explorer and geographer who was a friend to Columbus. 

The first recorded celebration of Columbus Day in the United States took place in New York City on October 12, 1792 when a group known as the Columbian Order held a parade to celebrate the 300th anniversary of the landing of Columbus. In 1866, following the start of Italian immigration to the U.S., another parade was held in New York City, this time by the Italians celebrating their link with American history. In 1937 President Franklin Roosevelt proclaims October 12th as Columbus Day. Then in 1968 President Lyndon B. Johnson declares Columbus Day a federal public holiday, to be celebrated on the second Monday in October, rather than on October 12th. The new "Uniform Monday Holiday Act" goes into effect in 1971.


On August 3, 1492, Christopher Columbus, a sailor from Genoa, Italy and the 88 members of his crew, plus their families attended Mass in the Church of St. George the Martyr. They prayed for a safe voyage. Leaving the church they boarded their three ships the Nina, the Pinta, and the Santa Maria which was Columbus’ flagship and began their voyage to the East Indies. Columbus Day is also celebrated in Spain, the country which sent Columbus on his famous voyage and whose Queen, Isabella of Castile provided the financing (money came from the Queen’s personal funds not the national treasury) for his expedition. In Spain the holiday is known as Hispanic Day, and it is celebrated with a huge parade in Madrid. In New York City, they celebrate with an annual parade which is also broadcasted internationally to Italy. While it is a nationally recognized holiday, not everyone is quick to participate in the festivities. Many people are insisting that it is not fair to celebrate a “discovery” that already had inhabitants, the Native Americans and therefore some states celebrate the holiday by a different name.

The arrival of Europeans in the Americas was without a doubt one of the most important events in modern history, including food history. Many foods that were native to the Americas were brought to Europe and even more European products were brought back to America. Many Americans, especially Italian-Americans, celebrate Columbus Day with food. In honor of the meal that Christopher Columbus must have eaten on the sail to the Americas, people cook a typical seaman’s dinner. That meal consisted of fish, potatoes, beef, cheese, and a variety of other foods such as rice, dried fruits, and legumes. 


Even though it must have been a good meal for them on the sea, it just doesn’t sound Italian enough for me. Where was the lasagna, meatballs, pasta, and we can’t forget Italian cookies, and desserts? Well, I am not at sea, but I do have a wonderful recipe of the week for you and it is called “Stuffed Italian Artichokes.” I know, you must be saying, I don’t like them, you are wrong! Till you have tried my mom’s recipe made with spices, cheese, and bread crumbs all tucked together inside the leaves of this wonderful little green vegetable, and then baked with a crispy top, you really haven’t tasted anything like this before! Now, that’s Italian! So in honor of my Italian-American Heritage and Columbus Day, have fun, celebrate, and eat something Italian!  
“Buon Appetito!”  

"Stuffed Italian Artichokes"

Ingredients:
6 medium artichokes
1 1/4 cups of bread crumbs (plain)
1/2 cup of grated Pecorino-Romano cheese 
1/2 cup of fresh chopped parsley
2 teaspoons of minced garlic (fresh or jar)
3/4 Tsp of salt & freshly ground pepper to taste
1/3 cup of olive oil or vegetable oil

Directions:
Cut off the stem and 1/4 off the top of an artichoke. Then remove some of the outer leaves at the bottom. Use scissors to clip off top of side leaves. (That removes the sticky point on each leaf) Then wash in a deep bowl. Fill a large pot with water and boil. Place the artichokes in the pot carefully and lower heat to medium for about 7 minutes. Fork test bottom of an artichoke for tenderness. If a fork goes in and out easily, they are done. Next drain and run cold water on artichokes let them sit and cool off. While they are cooling down, mix the bread crumbs, parsley, minced garlic, grated cheese, and a sprinkle of salt with pepper. Mix in a little oil with hands. When it feels like a sandy consistency then you are ready to fill. Gently spread the leaves a little apart and sprinkle some of the bread crumb mixture between each of the leaves. Place the now stuffed artichokes in a glass Pyrex baking dish. (7x11x1.5) Drizzle a small amount of oil on top of each artichoke. Put a small amount of water in the bottom of a pan about 1/4 inch deep. Bake for about 25-30 minutes at 350° F. The top should be a little browned and crispy, when they are ready to eat.    

Till Next Time…….

Copyright © 2013 “Family Plus Food Equals Love” All Rights Reserved

Friday, October 4, 2013

Celebrate the Pasta-bilities, With “Mama’s Homemade Manicotti”

Beneventi! Welcome everyone, to my table, and let’s eat pasta, pasta, and more pasta! Did you know that October is “National Pasta Month?” Thirty-one days devoted to enjoying America's favorite food! It is estimated that pasta lovers eat their favorite food seven times a month - nearly twice a week! It shouldn't surprise anyone that when asked what food they could not live without 60% of those surveyed chose pasta, even instead of chocolate! Bringing American families exactly what they are looking for. Pasta is a versatile dish which can easily fit into a healthy lifestyle. It boosts energy, satisfies hunger, tastes great and can be prepared in a numerous ways. Pasta is a global food, which is consumed in all five continents. 

The first American pasta factory was opened in Brooklyn in 1848. I bet you thought it was an Italian that started the industry, you would be wrong! It was a Frenchman named Antoine Zerega. Pasta is enriched with vitamin-B which is necessary for cell formation, mental alertness, and energy conservation, plus it is very helpful in boosting the immune system. When the pasta is combined with vegetables, legumes, cheeses, olive oils, and fish, it is an added health advantage. To celebrate National Pasta Month, it is suggested that you try a new pasta. There are 600 shapes and flavors produced worldwide, including many whole grain options, as well as gluten free. But, watch your portions. Americans tend to overload their plates. A healthy portion of pasta is one to two cups cooked (1 cup of cooked pasta is about 200 calories). When eaten in the proper portions and in combination with healthy foods, pasta does not cause weight gain. Another way to enjoy pasta is to go meatless, try a hearty vegetable and bean soup or pasta with seasonal vegetables like cauliflower, or even pumpkin for a perfect fall meal. It's hard to pick a favorite. In 2011, Americans named spaghetti as their favorite shape. So, celebrate pasta and gather with family and friends to take advantage of a delicious meal. 

As you prepare pasta I would love to share a few tips with you: 
  
1. Use lots of water when cooking pasta. Do not add oil. Stir occasionally to keep the pasta from sticking together. 
2. Pasta is ready when it’s “al dente.” It should be cooked completely through, yet firm enough to offer some resistance to your bite. 
3. Many pasta shapes come in different sizes. The Italian suffix “ini” means smaller (Example: Spaghettini is a thin version of Spaghetti), while “oni” means larger.

Being an Italian-American, pasta is a big part of our family gatherings. I remember on Sundays my parents would invite the whole family over and “macaroni” as we called it, was on the menu for the day. The question everyone wanted to know was what type of pasta would my mom cook for our Sunday dinner? My personal favorites are Shells and Angel hair, or Capellini. The Shells always held the sauce in the little pockets and was fun to eat. The Angel hair, is much thinner than Spaghetti, it also cooks very fast. My recipe this week is one that my mother taught me how to make, which are like pillows of soft cheese in your mouth. “Mama’s Homemade Manicotti” is so delectable that you won’t mind some extra time in the kitchen creating these scrumptious crepes. Buon Gusto!! (Enjoy)

Mama’s Homemade Manicotti 


To make the shells (crepes):

Ingredients:   Makes about 24
8 eggs
2 cups all purpose flour
1 teaspoon of salt
1 cup of water
Small amount of butter for pan                                   

Directions: 
Put eggs in a blender, and then add water and salt. Then add flour a little at a time as you are blending together. Brush melted butter or a bit of oil in your sauté pan and pour batter into the pan, (I use a shot glass to measure out the amount of batter) tilting to coat the bottom of the pan (you want a very thin crepe). Cook only until the underside is lightly browned and is just set, then turn and cook the other side. Invert onto plate; continue until you have about 24 depending on the size of the crepe. *** You can freeze these crepes till you are ready to use. Make sure you use a piece of wax paper in between them before you freeze, so it is easier to take apart without breaking the crepes.

The Filling for the crepes:

3 lb container of part skim or whole milk Ricotta 
1 lb part skim or whole milk Mozzarella cheese
3/4 cup Pecorino Romano cheese  
Fresh Parsley flakes chopped
1 large egg
Salt and pepper to taste
Marinara or Meat Sauce 

Directions for filling: 
1. Mix ricotta, cheese, parsley, and salt. Taste. Adjust seasoning according to taste and then stir in one egg. 
2. Slice mozzarella into small bite size pieces. Then add to the mixture of ricotta etc. Mix all together. 
3. Lay crepe on a flat surface or in your hand. Place about 1 tablespoonful of ricotta (more if the crepe is larger) into the center of the crepe and spread out to edges. Fold one edge halfway over and then fold the other side to form a packet. They should be sort of flat.
4. Spread a layer of sauce onto a baking pan. Lay manicotti side by side and arrange them until the pan is filled. Add another layer of sauce on top and sprinkle with grated cheese. 
5. Bake at 350° for 25-30 minutes and the sauce is bubbling and cheese is melted.

Till Next Time…….

Copyright © 2013 “Family Plus Food Equals Love” All Rights Reserved

Friday, September 27, 2013

“Dottie’s Apple Pie” Recipe As Fall Begins….

Can it be….I feel a chill in the air! The leaves are starting to fall, and the kiddies are back in school. This means only one thing, that Fall has turned the corner. The first day of autumn was last Sunday, the Autumnal Equinox. It is so hard to believe that the summer went by so fast and here we are in the fall season. I think as the years go by, time gets shorter, especially when we are getting older.

When it gets cooler, I love to open the windows and just be able to breathe the crisp air that comes at this time of year. To me this is a magical season. Pumpkins, Apples, Indian corn, and Gourds are all around us. The colors of the leaves, with its gold, red, and green hues that are so brilliant it is like a kaleidoscope of colors. The hustle and bustle of the approaching holidays, Halloween, Thanksgiving, and my favorite of all, Christmas. The chill in the air means sweaters, jackets, and rosy cheeks on children’s faces from playing outside in the leaves. As you look inside the windows of the houses, you can see families cooking, fireplaces lit, and you get the feeling of a warm cozy home. Cooking hearty meals, such as stews, soups, baked bread, and apple pies are all aromas that enhance your senses that fall is here. As you take a brisk walk in the nippy air you can see pumpkins, wreaths, and scarecrows decorating the houses on the blocks. To me fall is also a time to be thankful for your family and your friends. So, now that you know what autumn means to me, come along and let us explore the “Apple.”

Apples are one of the few fruits you can find fresh any time of the year, especially September through November. However, to me the apple is the one fruit that I associate with fall more than any other. Apples are America’s favorite fruit. The state of Washington grows the most apples followed by New York, and then Michigan. This is a perfect time of the year to head on out to an apple orchard and pick your own apples for a pie, Applesauce, or even baked apples. But to me the best way is to pick one off of the tree and try it. There is nothing like the crisp, cool, crunch you hear as you take a bite of this juicy, sweet piece of fruit. Today we have numerous varieties of apples to choose from. Some are best to eat while others are best for cooking and baking. You must have heard the old saying, “An apple a day keeps the doctor away.” This saying comes from an old English adage, “To eat an apple before going to bed, will make the doctor beg for his bread.” 
My son Paul, when he was young
at Maskers Orchard
I remember when I was about 11 or so, my parents would take the family and drive to Maskers Apple Orchard in upstate New York, for a fun afternoon of apple picking. We would run and find a spot so we could pick the apples from the trees and put them in a big bushel.  My mom would make us lunch, and we were allowed to picnic on the grounds in-between the apple trees. It was wonderful, especially on a crisp day. The orchard had a Country Store that we would visit at the end of the day. As we entered the store the aromas that would encircle our heads were like a bit of heaven. The shelves held home made jams, jellies, honey, and candy apples. They also sold baked goods, like home made breads, cakes, and pies. Driving back home with the car filled with apples and goodies, I always thought that this was one of my favorite memories with my family. When I had my son, many years later, I continued the tradition of going apple picking at Maskers Orchards and now my son will have memories like I did.  

So, in honor of the beginning of Fall, I am sharing with you my “Apple Pie” recipe. This pie is a favorite among my family and friends. After years of making this scrumptious pie, I have perfected its fruity richness,, and I’m sure it will be very pleasing to your taste buds. Enjoy and make memories!

"Dottie’s Apple Pie"

Ingredients:
8-10 apples (Macintosh and 2 Granny Smith)
1 cup of granulated sugar
1/4 teaspoon of salt
2 1/2 tablespoons of flour
1 teaspoon of cinnamon
1 tablespoons of unsalted butter
1 recipe of Pillsbury™ Pie Crust (just unroll)
(You can make your own crust, but this is a time saver) 
Secret ingredient is a dash of fresh Nutmeg 

"Dottie's Apple Pie"
Directions:
Pare and slice apples very, very thin. Sift dry ingredients together and mix with apples. Line pie pan (9 inch glass or aluminum pie tin) with the pastry crust. Fill with apple mixture, dot with butter before putting on top crust. Then put top crust on the pie. Crimp edges, cut three slits in top of pie or use a pie stencil. Brush pie with milk, cream, or egg wash. Then sprinkle the pie top with some granulated sugar before baking. Bake in a very HOT oven 450 ° for the first 15 minutes. Then reduce the temperature to 350 ° for the next 45 minutes or longer till golden brown. Put pie on lined cookie pan, (foil or parchment paper) so if any drippings come out from the pie, it will be easier for clean up.      

Till Next Time………..


Copyright © 2013 “Family Plus Food Equals Love”  All Rights Reserved

Friday, September 20, 2013

“Gatto di Patate” or “Neapolitan Potato Pie” Recipe For "National Potato Month"


“You like potato, and I like potahto - You like tomato and I like tomato-Potato, potahto, tomato, tomahto. Let's call the whole thing off” This fun song “Let’s Call The Whole Thing Off” was written by Ira and George Gershwin, and sang by many different artists. No matter how you say it, the “Potato” is a very important root vegetable. It contains, vitamins, minerals, and fiber that is vital for your daily nutritional requirements. This little tuber is rich in Vitamin C and potassium.  Potatoes are one of the vegetables in the nightshade family, which includes eggplant, tomatoes, and bell peppers. 

The potato is the world’s most widely grown, and the fourth largest food crop of fresh produce, after rice, wheat, and corn. The month of September is scheduled as “National Potato Month.” It is thought that the potato was first brought to the United States in the early 18th century by the Irish immigrants who settled in New England. In Europe, the Carmelite Sisters, introduced the potato in Genoa, Italy in the year 1584. They were also known as the “Bread of the Poor.” 

The potatoes appearance is small, lumpy, and clumsy. Its color can be yellowish, purple, red, orange, or white. They are easy to cultivate, maintain, and are highly prized in kitchens around the world. The ways to prepare this valuable tuber are almost unlimited. Potatoes can be served hot or cold, with or without the peel, whole or in pieces, mashed, fried, seasoned or plain. They can be eaten alone, or with other ingredients, they are an empty canvas for your own masterpieces. The potatoes are a favorite food for many people across the world and consider them a comfort food. 

The potato is most accommodating, but did you know that it can be used to brew alcoholic beverages such as Vodka? Potatoes are used as well to feed domestic animals. The starch of the potato is used in the food industry for thickeners and binders of soups and sauces. In India, potato skins along with honey are a folk remedy for burns. Mainly Russet potatoes are commonly used in plant research. I bet you didn’t know that in the textile industry they use the potatoes as adhesives for manufacturing of papers and boards? 

The potato is so versatile that it can be eaten many different ways. Potato gnocchi is particularly popular in Italy. These little pillows of pasta are made with potatoes, and tomato sauce is added on top with grated cheese. Another popular dish is a gratin which is made with mashed potatoes, cheese, and baked so all the cheese is gooey. An Italian version of a gratin is what we call a “Gatto” or a Potato Pie. My recipe this week is my updated version of Mary Ann/Ciao Italia’s “Gatto di Patate” or a Neapolitan Potato Pie. This savory potato pie can be used as a side dish, but also can be eaten as a main dish, due to all the ingredients that are added. It can be made with fresh or leftover mashed potatoes. Bits of cheese and cured meats that you may have on hand can be a delicious addition. There is no right or wrong to this recipe, whatever you like can be an extra treat to your recipe. Hope that you try this recipe and enjoy! Delizioso!!

Gatto di Patate” or “Neapolitan Potato Pie

Serves: 6-8 people

Ingredients
4 large baking potatoes, baked. peeled, and mashed
1 stick unsalted butter, softened
2 eggs, slightly beaten
1/2 cup of milk
1/4 cup grated Parmigiano-Reggiano cheese
1/4 cup grated Pecorino Romano cheese
1/4 pound of diced ham
1/4 pound of Italian salami, diced
3 tablespoons fresh minced parsley
1/2 pound of mozzarella cheese, cubed
Some breadcrumbs for top of Gatto 

Directions:
Butter a 4.8 quart or a 15 x 10 x 2 inch baking dish and set aside. Preheat the oven to 350 ° F. Mash your potatoes in a large bowl until smooth. Stir in 1/2 stick of butter, 2 eggs, milk, and both grated cheeses. Now stir in the ham, salami, mozzarella, and fresh parsley. Spread the mixture in the buttered baking pan. Sprinkle the breadcrumbs over the potato mixture. Heat the rest of the butter and drizzle over the breadcrumbs. This will make the top crispy. Bake the Gatto for about 20-30 minutes or until the top is nicely browned. Serve hot so the cheese is gooey, and all the ingredients are blended beautifully. Enjoy!

Till Next Time……………………………

Copyright © 2013 “Family Plus Food Equals Love” All Rights Reserved

Friday, September 13, 2013

A Story From The Past...Plus A "Baked Chicken with Onions and Potatoes" Recipe

Before chickens came packaged in plastic wrap and became available in our chain grocery stores, there were live poultry markets in many cities. I remember a story that my mother told me about this very subject. 

Picture it, about the middle 1930’s my mom would go with her mother……They lived in Bensonhurst, Brooklyn and would go to a live poultry market to pick a chicken for dinner. As my mom walked to the market with her mother, she would see many pushcarts and vendors of street food. When she finally got to the poultry market she would see the two windows on each side of the door. In those windows were live ducks and live rabbits. As she entered the front door to the market there were many size crates with live chickens lined up on shelves. They had about 15 chickens in each crate. My grandmother would then go to the crates and feel a chicken’s breast for fullness. She would then call the owner of the market who wore a white lab type coat. He took the chicken my grandmother had chosen and went to the back of the store. My mother being very young and curious peeked in the back door and watched what happened next. I am not going to get as graphic as my mom did when she told me this story, but let us just say that the chicken was killed, cleaned, and the feathers were taken off.  The man would then place the chicken in a paper bag, and now it was ready to be prepared for dinner that night. There were no freezers at that time, so all the food had to be bought daily. There are still today some cities that have live poultry markets, but I still prefer to go to my local Stop and Shop and get my chicken there. As they say, “we have come a long way baby,” since the 1930’s. 
1943 grandma Julia, my mom,
and grandpa Louis

September is “National Chicken Month,” so come with me and let’s see what all this cackling is about! The domesticated chicken has a genealogy that is very complicated. It stretches back 7,000 to 10,000 years. Europeans arriving in North America found a continent filled with turkeys, and ducks for eating. Some archaeologists believe that chickens were first introduced to the New World by Polynesians who reached the Pacific coast of South America a century or so before the voyages of Columbus. Well into the 20th century, chickens are valued, and they produce eggs, which plays a role in the American diet and economy. 

By the way, has anybody figured out if it is the chicken or the egg, what came first?


Poultry is the term for domesticated birds that are meaty enough to eat. Poultry tends to be lower in saturated fat than other meats, so it's a good choice if you're worried about your health or weight. You can lower the fat still more by removing the skin and by using light meat from the breast. Younger birds are more tender than older ones, so they're best for grilling, roasting, and frying. Older, tougher birds do better if they're cooked in stews or soups. Because of its relatively low cost, chicken is one of the most used meats in the world. Nearly all parts of the bird can be used for food, and the meat can be cooked in many different ways. Popular chicken dishes include roasted chicken, fried chicken, chicken soup, and Buffalo wings just to name a few. 
Chicken cut up: legs, thighs, breasts, & wings

Chicken Equivalents: One pound boneless chicken = 3 cups cubed meat. Chicken is a relatively lean and inexpensive meat, so it's a culinary workhorse. Broiler-fryers = fryers = broilers are between 2 1/2 and 5 pounds, and can be broiled, roasted, or fried. Capons-are castrated male chickens that are large (between 5 and 10 pounds) and tender, and have relatively more white meat. They're great for roasting. Free-range chickens are tastier and more humanely raised, but tougher and more expensive. Cut-up chickens are broiler-fryers that are cut up and packaged with two breast halves, two thighs, two drumsticks, and two wings. 

My recipe this week is called “Baked Chicken With Onions and Potatoes”. This dish is one that my mom taught me, and it is very scrumptious. The flavors of all the ingredients melt in your mouth as you take that first bite. The aromas fill the kitchen with a feeling of contentment and love. Delizioso! 

"Baked Chicken with Onions and Potatoes"


Ingredients:
3 1/2 to 4 pounds whole chicken or cut up pieces
2-3 yellow onion, chopped into 1 inch wedges
4-6 potatoes, peeled and cut into 1 inch chunks (white or sweet)
1/4 cup vegetable oil (enough to just coat the chicken)
Salt and pepper to taste
2 tablespoons of oregano

Directions:
Preheat oven to 350° F. Rinse chicken and pat dry. Arrange chicken, onion and potatoes in a baking dish and drizzle with oil. Season with salt, pepper, and oregano. Add a small amount of water to the bottom of the pan so the chicken doesn’t stick. Bake, stirring the vegetables once, until chicken is cooked through, about 1 1/2 hours. Let rest 10 minutes before serving. Serves 4-5 

Till Next Time…………………………….

Copyright © 2013 “Family Plus Food Equals Love” All Rights Reserved

Friday, September 6, 2013

"Italian Stuffed Mushrooms" On The Menu For September

Join with me and let’s celebrate “National Mushroom Month.” which is observed every September. Since I can remember, growing up in my Italian American family, my mom would always use mushrooms in her recipes. There are many varieties of mushrooms, such as the white button, crimini, portabella, shiitake and oyster to name a few. The button mushroom is the most widely used. My mom would use a number of varieties for different dishes, but she preferred to use the white button mushrooms more than the others. 

To have a better understanding about where mushrooms originated from and some interesting facts, we have to travel back to ancient folklore. Egyptians believed that mushrooms were the plant of immortality. The flavors captivated the Pharaohs so much that mushrooms were decreed food for the royalty. Common people were not allowed to even touch them. According to some people Louis XIV was one of the first growers of mushrooms in France. Mushrooms were grown in caves. France showed England how simple a crop of mushrooms were to cultivate, so England began to produce them as well. The first American to cultivate mushrooms here in the United States was Louis F. Lambert from Minnesota. Many people found that mushrooms were easy to grow and cheap to buy. Pennsylvania is the lead in mushroom production. Speaking of Pennsylvania, if you are a fan of all things mushroom or just want to enjoy a fun (gi) time, go to Kennett Square in PA and join in the Mushroom Capital of the World for the annual Mushroom Festival. 

Edible mushrooms are known as “the meat” of the vegetable world. Most mushrooms are sold in supermarkets which have been grown in mushroom farms and are used in cooking many different cuisines of the world. Here are some tips as to selecting and cleaning mushrooms.

Selecting:
1. Purchase mushrooms that are firm with a fresh, smooth appearance
2. Surfaces should be dry, but not dried out and appear plump
3. Some mushrooms may keep for up to one week in the refrigerator
4. Fresh mushrooms should never be frozen, but frozen sautéed mushrooms will keep for up to one month 
 
Cleaning:
1. Brush off any dirt with your fingers or a damp paper towel, or rinse the mushrooms briefly under running water and pat dry with a paper towel
2. Do not soak mushrooms in water as they easily absorb moisture


Dried mushrooms are often excellent substitutes for fresh. You can reconstitute dried mushrooms by soaking or simmering them. Don’t throw away the soaking liquid, as it can add flavor to your sauce. They're low in calories and sodium, so they add flavor to meals without adding too much of the things you don't want. They contain no fat or cholesterol and are full of Vitamin D.


My Mom
Now that you know all about mushrooms, you can try my mom’s recipe called “Italian Stuffed Mushrooms.” This dish has been in my family for years, and everyone loves it. My mom used to make this flavorful recipe mainly for holidays, until it was requested by family members for her to prepare this dish for a nonholiday as well. You can use this as a side dish or even as an appetizer. As you place a mushroom into your mouth, you have to close your eyes and taste the savory flavor of the spices, and cheese in the breadcrumb stuffing mix. All of these ingredients enhance the richness of the mushroom. Absolutely “yummy” and I’m sure it will be a favorite in your family as well as in mine.

Italian Stuffed Mushrooms” 

Ingredients:
48 oz large white button mushrooms
2 cups of plain dried bread crumbs
1/3 cup of Pecorino Romano grated cheese
3 teaspoons of minced garlic fresh or jar
2 tablespoons of fresh chopped Italian parsley
Salt and freshly ground pepper to taste
1/3 cup of olive or vegetable oil

Directions:
Preheat oven to 350 F. Clean mushrooms and take the stem off. Mix the bread crumbs with the parsley, garlic, Pecorino Romano, salt and peeper in a small bowl. Now add some oil (about 2 tablespoons) and mix with hands. If you need more oil put in small amount each time until you are mixing the right consistency. When it feels like a sandy consistency then you are ready to stuff the mushroom caps and place on a large cookie pan/sheet. Now, drizzle a small amount of the remaining oil over the top of each mushroom. (This is so they do not dry out, but do not soak) Bake until mushrooms are browned and tender about 25-30 minutes. 

Till Next Time……
 
Copyright © 2013 “Family Plus Food Equals Love” All Rights Reserved


***This Wednesday is the 12th Anniversary of 9/11, a day most Americans and the world will never forget. An attack on America took place that day in 2001, and thousands of people lost their lives. The entire country was impacted by this tragic day’s events. I would like to say that my heart and prayers go out to the families that have lost loved ones in the World Trade Center in New York City, the Pentagon in Washington D.C., and in Shanksville, Pennsylvania. Plus, my prayers also go to the First Responders, because of their bravery; many have also lost their lives. May our country and the world be safe and God Bless America.*** 

Friday, August 30, 2013

"Colorful Corn Salad" And "Italian Stuffed Peppers" To Celebrate Labor Day!

Coming to terms with the end of summer is a rough thought for some people. Were did it all go? Yesterday seems like we were just starting the month of June and here we are starting September already! Parents all over are getting prepared with supplies for their children to start another year of school. Before school begins and we start packing up the beach gear, lawn chairs, pool supplies, plus our grills, we have one more weekend of summer time fun that is called Labor Day! Personally, nothing says Labor Day weekend to me like a family BBQ or cookout. Labor Day is on Monday September 2nd this year, and I’m sure we are all looking forward to a long enjoyable weekend as we start the month of September. This weekend celebrates the “unofficial” end of summer. Everyone is going to the beach, having picnics, going to fairs, and enjoying the last weekend of their summer activities.

You may ask, what is Labor Day and why do we celebrate this day? So here are some facts about the holiday. Labor Day is an American Federal Holiday that celebrates the economic and social contributions of workers. We pay tribute to the achievements of the American workers. It is also supposed to be a day of rest and considered a workingman‘s holiday. The first Labor Day was held on September 5th 1882 in New York City. Then on June 28th 1894 it became a Federal holiday, stating that the first Monday, in September of each year would be a legal holiday in all U.S. territories. In addition, Labor Day marks the beginning of the season for the National Football League, (NFL) and some college leagues as well. Labor Day is also a great day for stores to have “End of Summer” sales.

In Italy, many Italians observe Labor Day as well. It is called La Festa dei Lavoratori. They observe this nationwide holiday on May 1st. A holiday that was connected with agricultural cycles and still celebrated in some regions throughout Italy. Farmers and workers traditionally took the day off. They relaxed and had parties with food, drinking, and dancing. This was to show their support for the social and economic achievements on this day.


So before you bid this summer farewell, go out with a bang on this Labor Day! Whether you are heading out of town, staying in the city, spending the day quietly at home relaxing, or enjoying one final celebration of the summer, be sure to relish the day with your family and friends.

This week I have two recipes to share with you. I remember a recipe that my mom taught me called “Italian Stuffed Peppers.” (was created by my mom) They are made by stuffing cubanelle peppers with a bread crumb filling topped with tomato sauce and baked. Cubanelles are a long slender banana-shaped sweet pepper, also known as Italian frying peppers. You can use this recipe as a side-dish.

The other dish is my rendition of a recipe I found in a magazine which I call “Colorful Corn Salad.” The combination of all the ingredients mixed together is not only colorful but also is harmonious in your mouth. These two recipes will be hits on your Labor Day weekend BBQ‘s, family gatherings, or even at home relaxing. 


Cubanelle Peppers
Italian Stuffed Peppers

Ingredients:
6 Cubanelle peppers, tops and seeds removed
3 cups of your favorite tomato sauce
3 cups unflavored bread crumbs
4 tablespoons of chopped fresh parsley
2 teaspoons of minced garlic
1 cup of grated cheese (Pecorino Romano)
Salt and pepper to taste
Olive oil

Directions:
Cut 1/2 inch from the top of a washed pepper and remove the seeds. Mix the bread crumbs with parsley, minced garlic, grated cheese, salt and pepper. Add a small amount of oil and mix with hands. When it feels like a sandy consistency then you are ready to fill the peppers. Fill the peppers with mixture (do not fill to tightly as it will become dry) Put about a 1 1/2 cups of tomato sauce on bottom of a baking dish so they will not stick. Place peppers in the baking dish, cover with remaining 1 1/2 cups of tomato sauce and sprinkle a small amount of olive oil on top of the peppers. Bake the peppers at 350° for about 30 minutes. Can also be eaten at room temperature. 


*********************************************************************************
“Colorful Corn Salad” 


Ingredients:
3 cans of sweet corn nibblets (water drained)
1 can of black olives (pitted) and chopped
3/4 cup of chopped grape tomatoes
1/2 cup of chopped green pepper
1/2 cup of chopped red pepper
1/4 cup of chopped onion or scallions
1/2 cup of ranch salad dressing (your favorite)

Directions:
In a large salad bowl, combine all vegetable ingredients, and then add the salad dressing. Stir till all coated, cover and refrigerate until serving. Serving is for 8 people or more, depending on how much of the ingredients you use. You can also add another ingredient or take one of them out. Your choice…just enjoy and Mangia Tutti!


Till The Next Time……………………….


Copyright © 2013 “Family Plus Food Equals Love”  All Rights Reserved

Friday, August 23, 2013

Breads And Homemade Italian Pizza! Pure Comfort Food....

As far as history has been recorded, bread has been a basic part of the world’s eating habits, and a traditional companion with meals. With fall approaching it is a perfect time to make bread and pizza. With the oven on and the aromas of bread baking, circling the room, there is nothing more comforting to the soul. There are various assortments of breads which include different textures and flavors but the most popular types are white, wheat, and whole-grains. In some recipes fruits and vegetables are used in bread making, but the most common ingredients include flour, sugar, yeast, eggs, nuts, spices, raisins, and milk.

In Italy, bread is taken quite seriously. Italians have rigid standards when it comes to what a loaf of bread should be. The basic standard Italian bread consists of yeast-leavened, unsweetened and baked in a loaf shape with tapered ends. A typical Italian loaf is thick and has a thin crust. The inside of an Italian bread loaf is moist and porous, which is perfect for absorbing toppings of tomatoes, olive oil, and cheeses. In the United States Italian bread arrived in the 18th century. Italian bread became quite popular very quickly. Today it is frequently used for sandwiches, as a side for soup, for dunking with olive oil and as a side for many Italian pasta dishes accompanied with a glass of wine. 
Nanni and myself years ago

In the baking world, there are many different types of bread flours on the market that make the difference to a successful loaf of bread. The most common of the baking flours used in households today is called all purpose flour. There is cake flour which is very good for baking cookies and cakes. Sourdough and pumpernickel breads use rye flour. Bleached flour has been treated with agents that make it whiter than other flours. (I personally use un-bleached flour) Self Rising flour is used regularly when baking, which is a combination of all purpose flour, salt, baking powder, and baking soda. There is flour that is labeled as bread flour and is used for baking breads or rolls. Soy flour is especially made for those who have gluten allergies as it does not contain gluten.


My grandmother---"Nanni"
As we continue in the baking world there are many types of breads that can be made with other ingredients such as: Bananas, Zucchini, Pumpkin, Corn, Carrot, French bread, Quick bread, Italian bread and Sour Dough bread. Additional items can also be added to your bread recipe such as nuts, raisins, spices and cranberries. 

Whatever the role bread plays in a meal, the delightful aromas fill a home and it stirs all the senses. I remember when my grandmother (who we called Nanni) would come over; she would make us a pizza with onions, tomato sauce and fresh mozzarella. She also used the best fresh herbs she could find. Instead of a round pizza pan, she would make the pizza in a baking pan. Her crust was always soft, and thick something like a Sicilian pizza would be. It was always a treat making pizza with her, as she would always tell a few stories about her Italian roots as we were eating. She never wrote her recipes down, so when she passed so did her recipes. She always said that her Italian dishes were all in her head. I found this recipe from MaryAnn Esposito at “Ciao Italia,” which is very similar to her recipe. I hope that you enjoy your pizza and make some bread; it really makes the house fragrant. It is what I would call, “real comfort food.”


Pizza Dough

Ingredients:
1 1/2 teaspoons active dry yeast
1 1/2 cups of warm water (110°-115° F)
3 1/2 to 3 3/4 cups unbleached All Purpose Flour
1/2 teaspoon of salt
1/2 teaspoon of sugar
1 teaspoon extra virgin olive oil

Directions: 
In a large bowl, dissolve the yeast in warm water. Allow the yeast to proof until it is foamy, about 10 minutes. Add 3 cups of flour, salt and sugar. Mix the dough with your hands or use a mixer with a dough hook. Add the remaining flour as needed to make a dough that holds together. Place the dough on a floured surface and knead it for about 10 minutes. Grease a bowl with the olive oil and place the dough in the bowl. Turn the dough a few times in the bowl so the oil coats the dough. Cover the bowl tightly with plastic wrap and let it rise for 2 hours in a warm place. Then punch down the dough and knead it for a few minutes on a lightly floured surface. Use the dough to make one large pizza or divide it in half to make 2 small ones. 

Now that your dough is made you can make your pizza with any ingredients you wish. Just make sure the ingredients are fresh and you will have a mouth watering pizza that you can’t wait to eat. Mangia!    

Till Next Time….

Copyright © 2013 “Family Plus Food Equals Love” All Rights Reserved

Friday, August 16, 2013

Italian Culture & “Sofia’s Peas and Pasta”

A few days ago I was watching a video called “Discovery Atlas: Italy Revealed.” It depicts the passionate culture of Italy as it follows six stories of Italians, including a jockey participating in a traditional “palio,” to a former fisherman trying to set a diving record off Sicily’s coast, to the Missoni family of the fashion world, and a Venetian gondolier’s attempt to keep his family in his native city. I was amazed while I was watching this very scenic and heart warming video. It brought to mind that the Italian people are on a journey, that features many cultural customs such as fashion, cinema, food, music, and architecture just to name a few. 

When the Italian’s came to the United States, they developed many customs that were not part of their lives before they came here; creating a culture that is independent of any other. As I continued to think about this, I thought that it would be an interesting subject to share with you my readers about Italy‘s cultural icons. 

Since, my great grandparents came from Italy to the United States I can understand the culture behind my family's heritage. It must have been extremely challenging for them to come to another country, with another language, and now have to learn how to fit in with other customs that they did not understand. I feel very blessed and honored to have come from a background of exceptionally strong and dedicated men, and women to seek a better life for their families. Here are some of the famous Italian Cultural Icons that may give you a better understanding of why Italy is the birthplace of Western Culture and is often nicknamed ll Bel Paese (The Beautiful Country).

Architecture: Italy has a very broad and diverse architectural style. Some famous structures are the Coliseum, Tower of Pisa, Grand Canal (Venice), Sistine Chapel, and St Peter’s Square (Vatican).
My great-grandparents Giovanni & Sofia,
plus my aunt Jessie & uncle Arthur when
they were young

Visual Art: Over the centuries, Italian Art has gone through many changes. Italian painting is traditionally illustrated by warmth of colors and light. Some famous paintings and figures are Mona Lisa by Leonardo da Vinci, Michelangelo’s David, others by Raphael, Donatello, Caravaggio, and Botticelli. Many of these artifacts are religious in nature.

Literature: The basis of the modern Italian language was established by the poet Dante Alighieri (The Divine Comedy), Boccaccio, Leopardi, Petrarch (invented the sonnet), Giordano Bruno, and Niccolo Machiavelli.

Music: From folk to classical, music has always played an important role in Italian culture. The Italian Opera, Antonio Vivaldi, Giuseppe Verdi, Toscanini, Rossini, Puccini, Pavarotti, Andrea Bocelli, and Enrico Caruso.

Cinema: The Italian film industry was born between 1903 and 1908. Some famous icons are, Dario Argento, Rossano Brazzi, Federico Fellini, Isabella Rossellini, Marcello Mastroianni, Sophia Loren, Gina Lollobrigida, Anna Magnani, Roberto Benigni and Dino De Laurentiis.

Fashion and Design: Italian fashion is regarded as one of the most important in the world. Milan, Florence, and Rome are Italy’s main fashion capitals. Armani, Roberto Cavalli, Dolce & Gabbana, Ferragamo, Gucci, Prada, Pucci, Valentino, and Versace. 

Italian Cuisine: Ingredients and dishes vary by region. Cheese and wine are major parts of the cuisine, playing different roles both regionally and nationally. Some famous dishes include pasta, pizza, lasagna, focaccia, gelato, bread, olive oil, salami, Parma ham, and cappuccino. Others include desserts are Cannoli, Biscotti, Pizzelle, Zappole, and Sfogliatelle. 

Italy is filled with beauty, culture and history. There is so much more to this boot shaped country and its people. My recipe this week is one that my great-grandmother Sofia passed down and eventually it was taught to me. It is a simple but yet very tasty dish that is from Calabria, where my mother’s family originated from in Italy. 

“Sofia’s Peas & Pasta"

Ingredients:
Ditali, Shells or any small pasta -1 lb 
1 pound of fresh or frozen peas
2 large onions sliced
Garlic 1 clove sliced
Oil olive, coat pan
Salt and pepper to taste
Grated Pecorino Romano to taste or to top dish

Directions:
In a large pot bring salted water to a rapid boil. Cook pasta according to directions until the pasta is al dente. Meanwhile heat olive oil in a pot and add sliced garlic. Now add onions when garlic is softened and color is light. Sauté onions till soft and translucent. Next add peas, plus a small amount of pasta water to coat peas. Add salt and pepper, cook until tender. By this time pasta should be cooked, drain and add to peas with onions. Mix well and add grated cheese to top your dish. Serve immediately. Yields: 4-6

Till Next Time……….. 

Copyright © 2012-2013 “Family Plus Food Equals Love” All Rights Reserved